Have you ever wanted to personalize wooden crafts with vibrant designs? Look no further than sublimation! In this video, we’ll explore 4 EASY methods to sublimate directly onto wood, no special coating required for some methods!
This video is perfect for beginners and experienced crafters alike. We’ll cover the different tools and materials you’ll need for each method, and walk you through the process step-by-step.
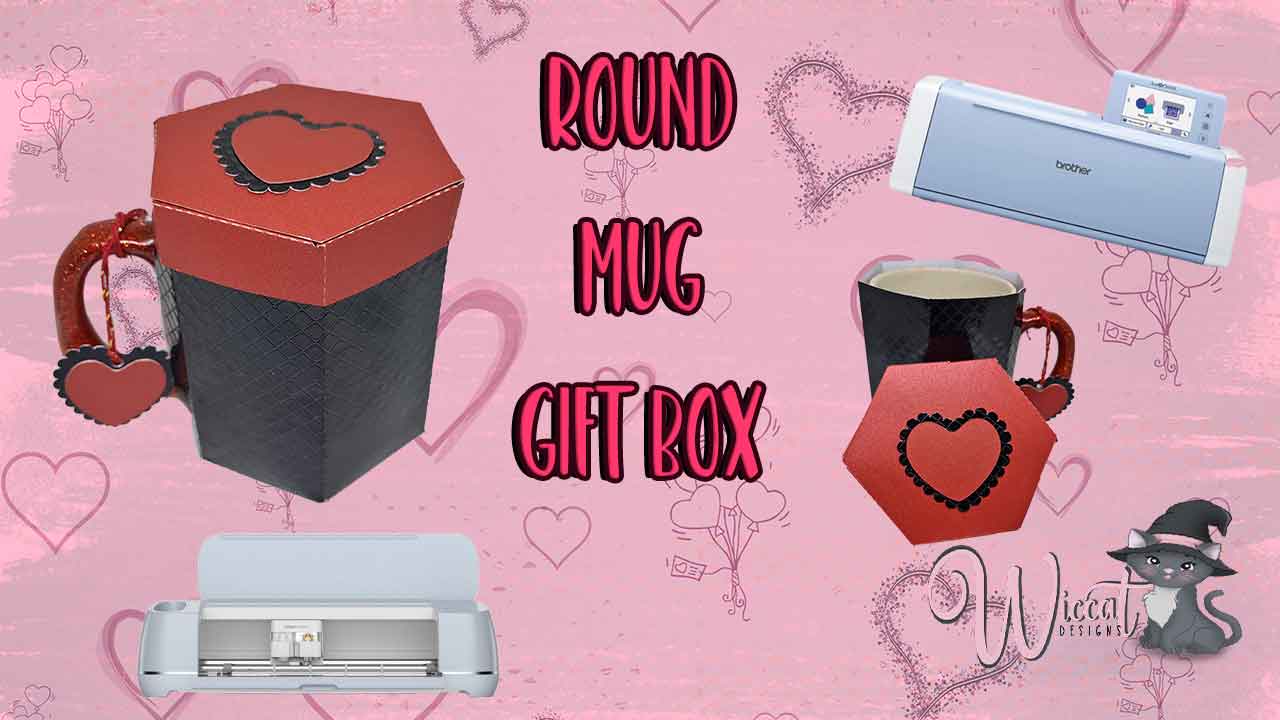
This tutorial will guide you through creating a charming round paper mug gift box with a lid using two different colored cardstock papers and your cutting machine. It’s perfect for small gifts, party favors, or just adding a personal touch to a mug purchase.
Materials:
Two contrasting colors of cardstock paper (one for the box, one for the lid)
Cutting machine (Cricut, ScanNCut, or Silhouette)
Strong adhesive (liquid glue or double-sided tape)
Optional: Ribbon, twine, or embellishments for decoration
Download or create a box template: Download my file “round paper mug box template” or create your own template based on your mug size.
Import and adjust: Import the template into your design software and adjust the size to fit your mug. Check measurements carefully!
2. Cutting:
Place your cardstock sheets onto the cutting mat according to your machine’s instructions.
Load the design into your machine and select the appropriate settings for cardstock.
Cut out all the pieces (base, sidewall, lid) in their respective colors.
3. Scoring and Folding:
Fold the box base and sidewall pieces along the scored lines.
4. Assembly:
Apply adhesive to the tabs on the sidewall piece.
Apply adhesive to the bottom edge of the sidewall (inside the box).
Place the mug inside the box.
5. Lid Creation:
Fold the lid piece along the scored lines.
Apply adhesive to one of the short edges of the lid.
Overlap the two short edges to form a circle and adhere them together.
Decorate the lid with ribbon, twine, or other embellishments (optional).
6. Final Touches:
Secure the lid onto the box by gently pressing it down.
Let the glue dry completely before filling the box with your treat or gift.
With a little patience and this guide and my youtube tutorial, you’ll have adorable round paper mug gift boxes ready to impress. Enjoy the crafting process and have fun gifting!
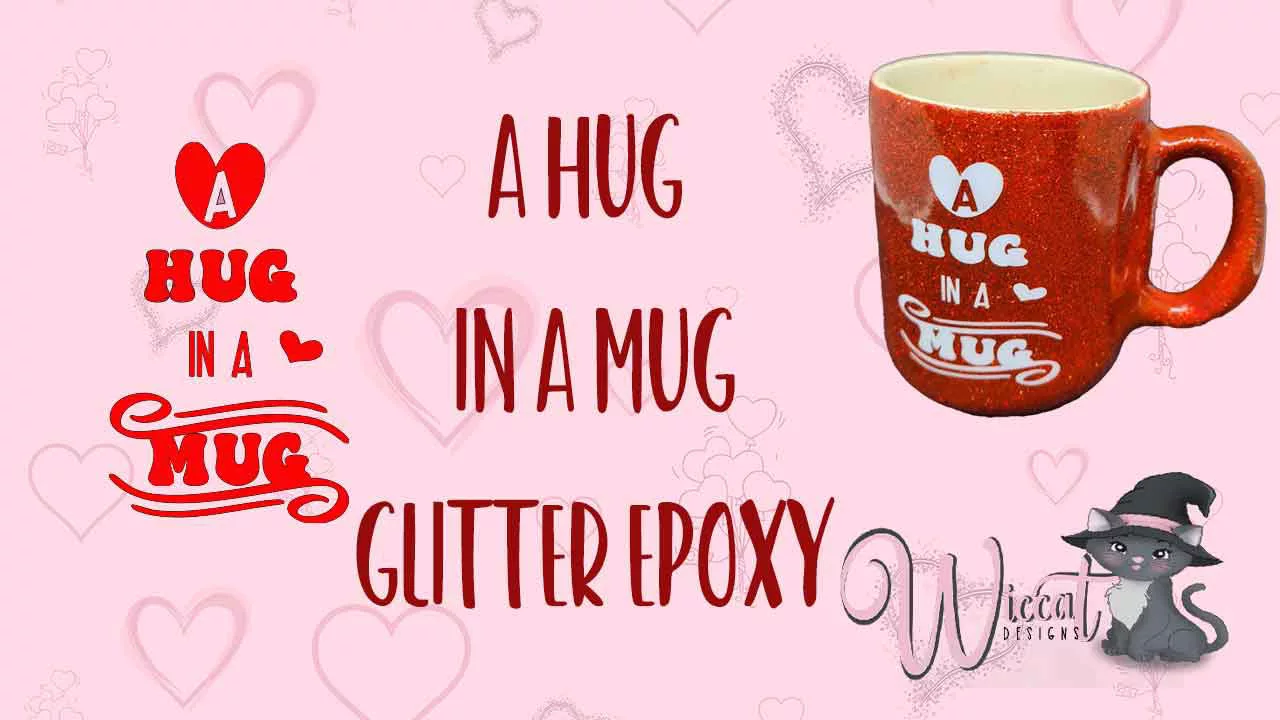
Tired of that old, chipped mug lurking in your cupboard? Well, get ready to say goodbye to boring and hello to GLITTER BOMB! ✨
In this video, we’re taking an epic journey of transformation, turning that sad mug into a showstopping masterpiece with the power of epoxy and glitter. It’s the perfect way to upcycle, get creative, and maybe even spark some serious mug envy amongst your friends.
Whether you’re a DIY pro or a crafting newbie, don’t worry! This tutorial is super easy to follow, with step-by-step instructions and all the tips and tricks you need to avoid any sticky disasters.
So grab your mug, dust off your glitter stash, and get ready to join me on this magical makeover adventure! We’ll be covering:
Finding the perfect mug candidate (hint: thrift stores are your friend!)
Prepping your mug for the sparkly transformation
Mixing and mastering the epoxy magic
Unleashing the glitter power! (with zero mess, I promise!)
Finishing touches and customization (because your mug deserves to be unique!)
By the end of this video, you’ll have a glittering masterpiece that’s ready to brighten your day (and maybe even hold your favorite beverage!).
So hit that subscribe button, grab your mug, and let’s get crafting! ✨
**Remember to like this video and leave a comment below if you’re excited for this mug makeover! What kind of glitter are you planning to use? **
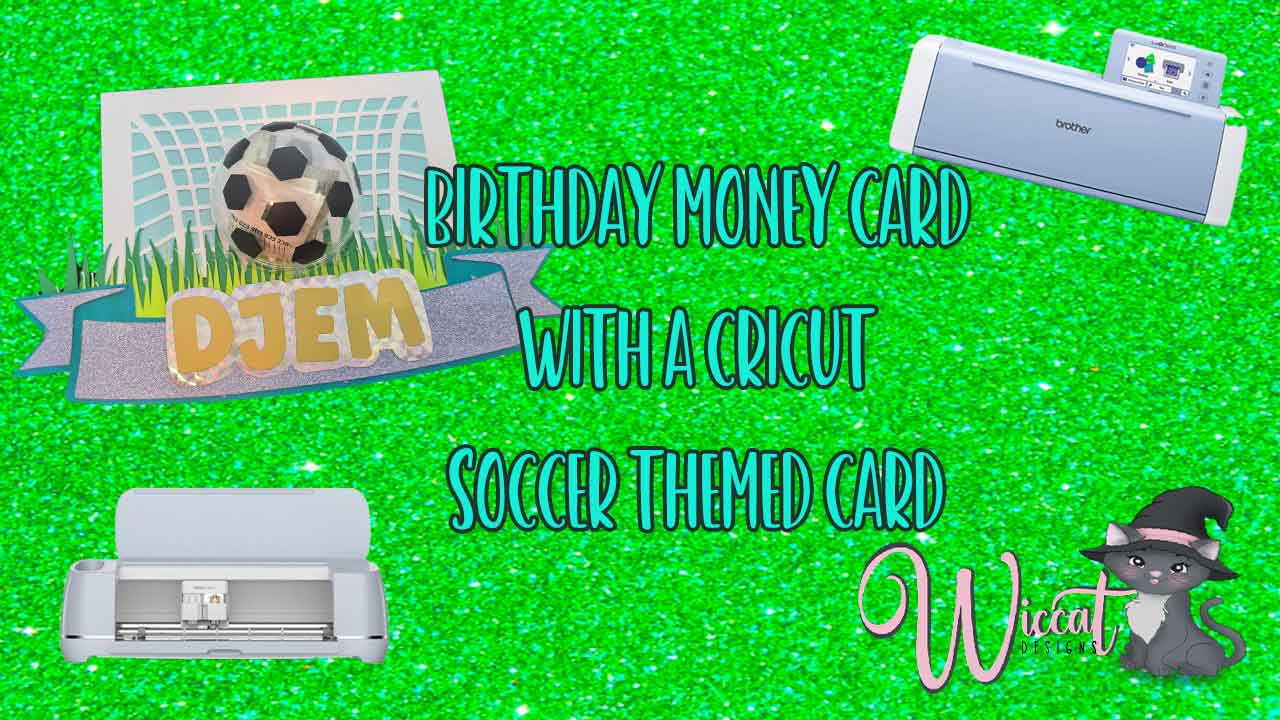
Calling all soccer enthusiasts! Celebrate the birthday of your favorite soccer fanatic with a personalized soccer-themed money birthday card made with your handy Cricut machine. This fun and creative DIY project is perfect for showing your appreciation and support for their passion for the sport. With just a few simple steps and some soccer-inspired materials, you can create a unique and memorable gift that will surely score a goal with the recipient.
Materials:
Cricut Machine: Your Cricut machine will be the star of this project. Whether you have a Cricut Explore Air 2, Joy, or another model, it will help you cut out the intricate soccer-themed designs with precision.
Soccer Cardstock: Choose a sturdy and high-quality cardstock that can withstand the cutting process. Opt for a color that complements your soccer theme or matches the recipient’s favorite team.
Soccer-Themed Vinyl: Adhesive vinyl is a great way to add personal touches to your card, such as the recipient’s name, a soccer ball graphic, or a motivational message.
A craft ornament and a glue gun
Money: Of course, the star of the show is the money!
Instructions:
Create the Card Base: Design your card template in Cricut Design Space or another compatible design software. You can use pre-existing soccer-themed images or create your own custom designs.
Cut the Card Base: Load the soccer cardstock into your Cricut machine and follow the cutting instructions provided by Design Space. Ensure the material is securely placed on the cutting mat to prevent any errors.
Weed and Transfer the Vinyl: Prepare your soccer-themed vinyl and apply it to a cutting mat. Follow the weed and transfer instructions in Design Space to carefully remove the excess vinyl, leaving only the desired design intact.
See my youtube video down below for more instructions
With a little creativity and effort, you can create a heartwarming soccer-themed money birthday card that will make the recipient feel extra special. This DIY project is not only a fun way to express your love for soccer but also a thoughtful gift that will be cherished for years to come.
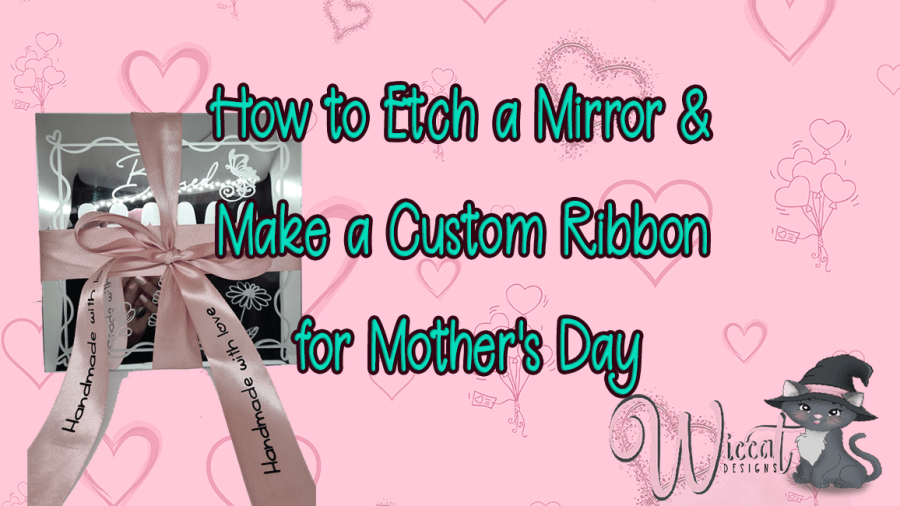
DIY: A Beautiful Etched Mirror with Personalized Ribbon for Mother’s Day
Mother’s Day is just around the corner, and what better way to show your love and appreciation for your mom than by giving her a personalized, homemade gift? In this DIY tutorial, we’ll show you how to create a stunning etched mirror with a personalized ribbon that your mom will treasure for years to come.
Here’s what you’ll need:
Supplies:
A mirror
Vinyl adhesive
Transfer tape
A cutting machine (or scissors if you prefer to cut the design by hand)
Glass etching cream
A paintbrush
Tweezers
Ribbon
An iron /press
My digital cut file available in my webshop
Iron on vinyl
Step 1: Design your mirror
Start by designing your mirror on your computer.
Load the file to your cutting machine, with vinyl you have loads of or an ugly color you never use.
Step 2: Apply the vinyl to the mirror
Use transfer tape to apply the vinyl to the mirror. Make sure the vinyl is firmly adhered to the mirror with no air bubbles. Use tweezers to hold small pieces of vinyl in place if necessary.
Step 3: Apply the etching cream
Apply the etching cream to the open areas of the vinyl with a paintbrush. Follow the instructions on the etching cream packaging for the correct time and amount. Make sure you use a well-ventilated area and protect yourself with gloves and safety goggles.
Step 4: Remove the vinyl
After the waiting period, rinse the mirror under running water to remove the etching cream. Then, remove the vinyl from the mirror. When you remove the vinyl, you’ll see your design etched onto the mirror!
Step 5: Personalize the ribbon
Now it’s time to personalize the ribbon. Make a text with your Iron on vinyl or your mom’s name to put on the ribbon. Heat up the iron or press and place the ribbon on top. Iron the ribbon and letter stencils until the letters are well attached.
Step 6: Finish the gift
Finally, all that’s left to do is tie the personalized ribbon around the mirror and your gift is ready! Your mom will love that you put in the effort to create a unique and personal gift just for her.
Etching a mirror and personalizing a ribbon may seem intimidating at first, but with a little patience and creativity, you can create a beautiful gift that your mom will cherish for years to come. Happy Mother’s Day!
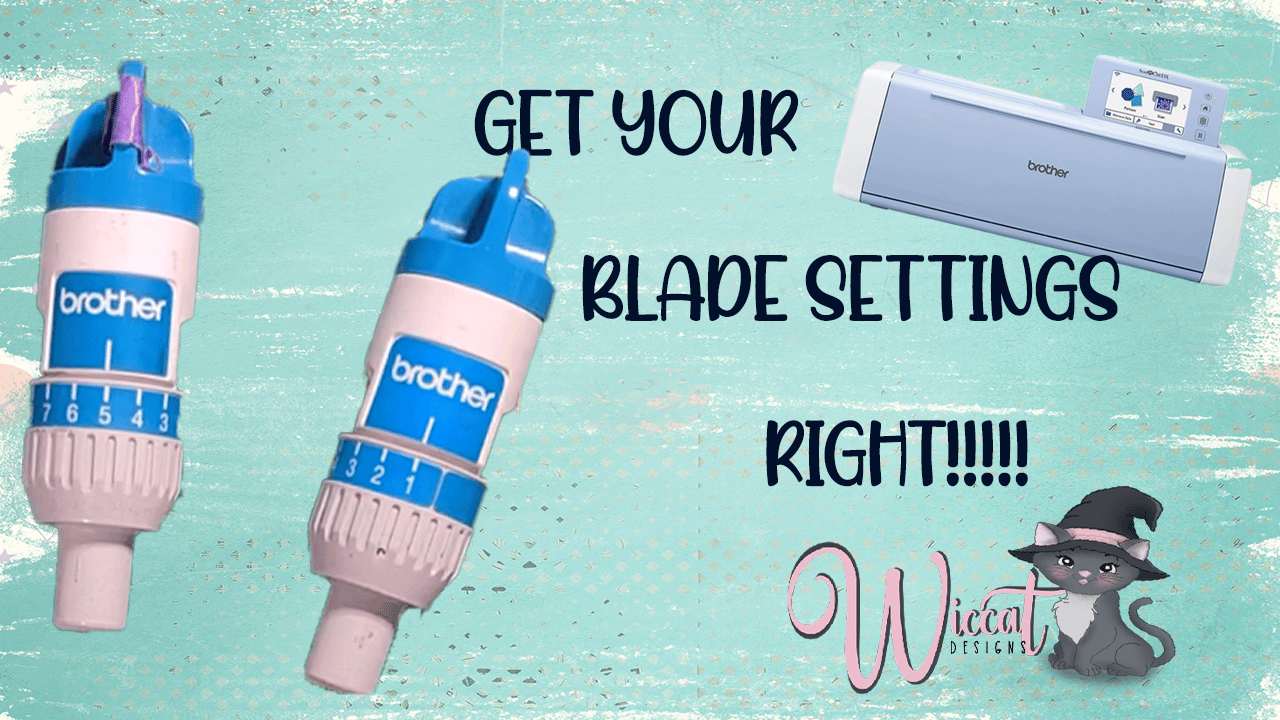
Have you ever struggled with the blade holder settings on your ScanNCut machine? It can be frustrating to constantly hear that the settings are variable, especially when you’re trying to cut a specific material.
The problem is caused by the fact that the settings are simply determined by two stickers, which are not placed in exactly the same spot on each holder. This means that every time you switch to a new holder, or even if you have multiple holders for different materials like I do, the settings will be different.
But don’t worry, there is a simple solution to this problem. I’ve made a short video to show you exactly what I mean, rather than trying to explain it through writing and leaving things open to interpretation. Check it out and see how easy it is to get consistent blade holder settings on your ScanNCut machine.
It looks kinda tricky but it isnt as hard as it seems.
It al starts with a cute an perfect picture
Spiral Betty is the website everyone uses to get their pictures turned into a spiral. Unfortunately you can only download a jpg file so you need to do some tracing.
You can adjust your spiral on 4 levels, how many spirals you want, you can crop your picture, you can make your picture lighter and darker and give it more or less contrast.
When you have adjust your picture you can download the jpg.
You can trace the jpg in Scal, inkscape, design space, illustrator and other programs that can trace images and turn them in to svg files.
For the scan n cut users i advice to put your file into fcm because that extenstion loads way faster then svg in the machine.
In this tutorial i used inkscape but i prefer SCAL that is my design program i always use.
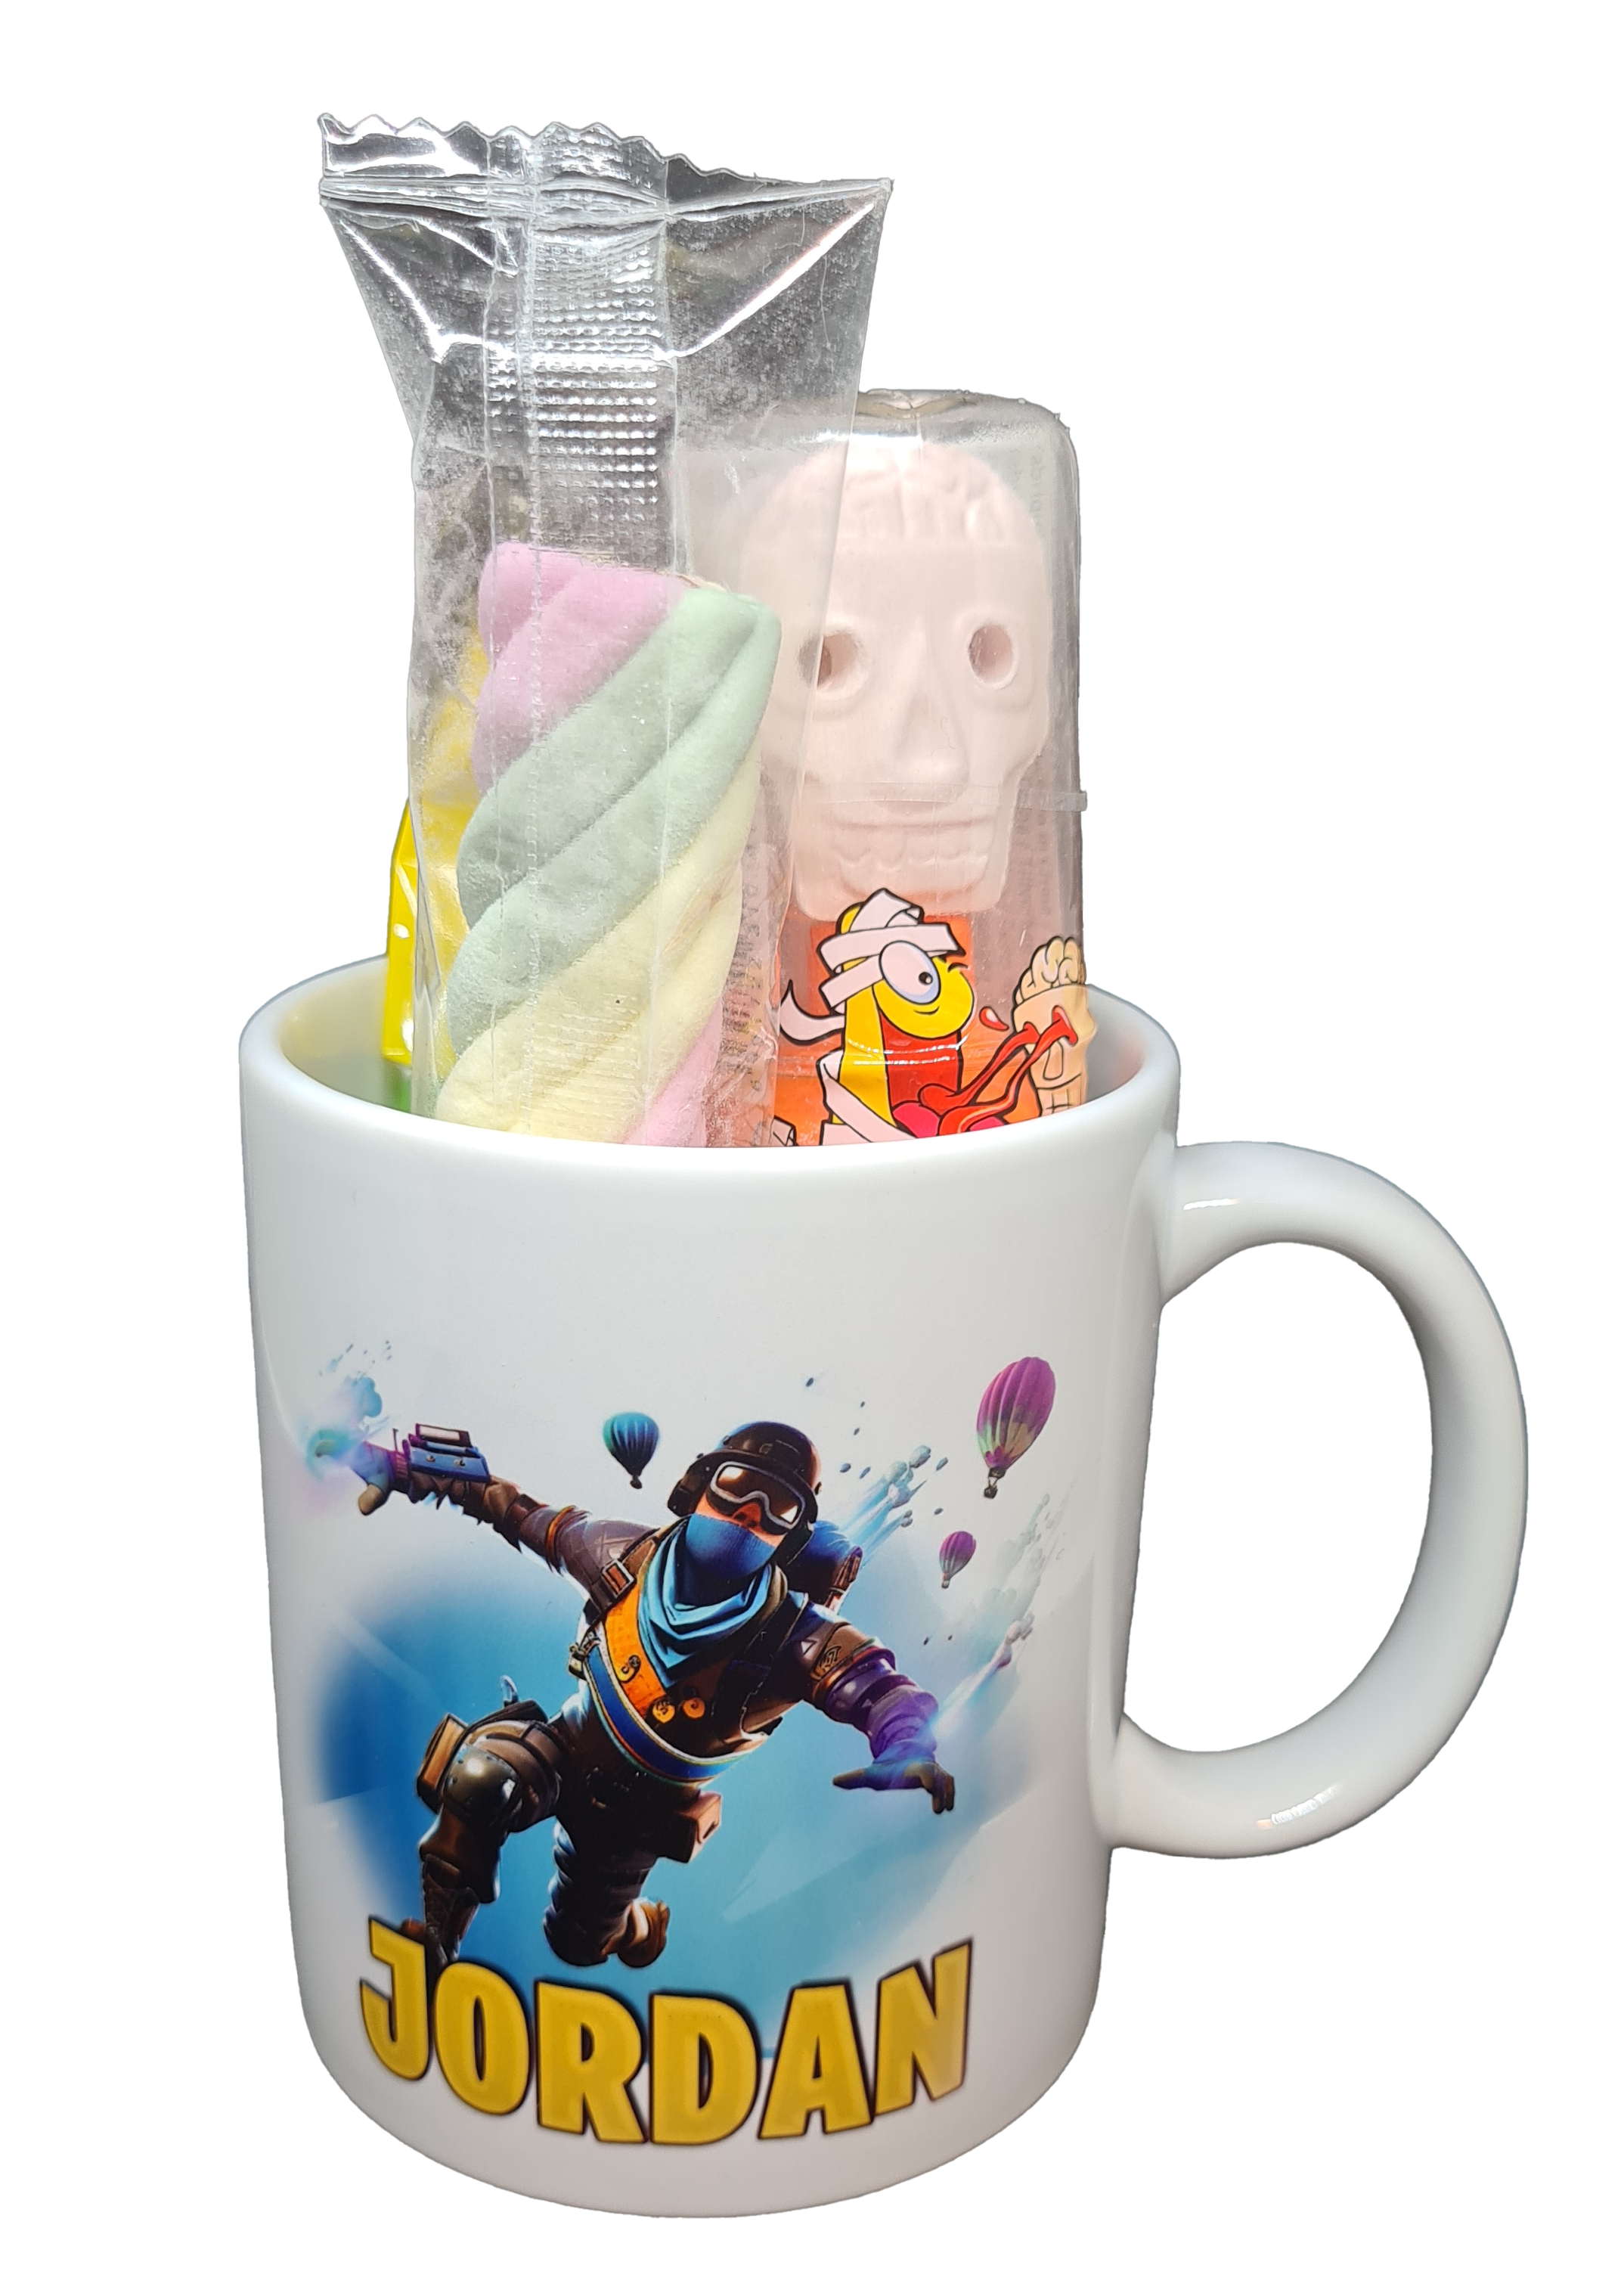
Finding the perfect thank you gift can be tricky. You want something personal, but also something they’ll truly appreciate. Well, fret no more! This blog post unveils a gift combo that’s guaranteed to put a smile on any recipient’s face: a personalized Fortnite mug paired with their favorite candy!
Why a Fortnite Mug?
Fortnite remains a gaming phenomenon, especially among young boys. A personalized mug featuring their favorite characters or skin becomes a daily reminder of your appreciation. Every sip from this mug will be a delightful celebration of their gaming passion.
The Power of Personalization
A personalized mug goes a long way. It shows you put extra thought and effort into the gift. You can customize the mug with their name, favorite character, or even a funny in-game saying. This personal touch elevates the mug from a simple cup to a cherished keepsake.
Sweeten the Deal with Candy!
Who doesn’t love candy? Pairing the mug with their favorite candy bars or bags of gummies adds an extra layer of fun and excitement to the gift. It’s a delightful surprise that complements the Fortnite theme and caters to their sweet tooth.
More Than Just a Gift, It’s an Experience
This gift combo isn’t just a mug and candy – it’s an experience. They’ll be thrilled to unwrap the personalized mug, then discover their favorite candy waiting inside. It’s a moment of pure joy and appreciation that strengthens your bond.
Beyond Boys: Adapting This Gift Idea
While this blog highlights the Fortnite theme for boys, the core concept is versatile. Personalize mugs with relevant themes for girls (think unicorns, rainbows, etc.) or tailor them to the recipient’s hobbies and interests. The candy pairing can also be adjusted to their preferences.
The Final Sip: A Sweet and Thoughtful Thank You
A personalized Fortnite mug paired with their favorite candy creates a unique and memorable thank you gift. It’s a thoughtful gesture that shows you care and celebrates their individuality. So next time you need a thank you gift, consider this winning combination – it’s guaranteed to be a hit!
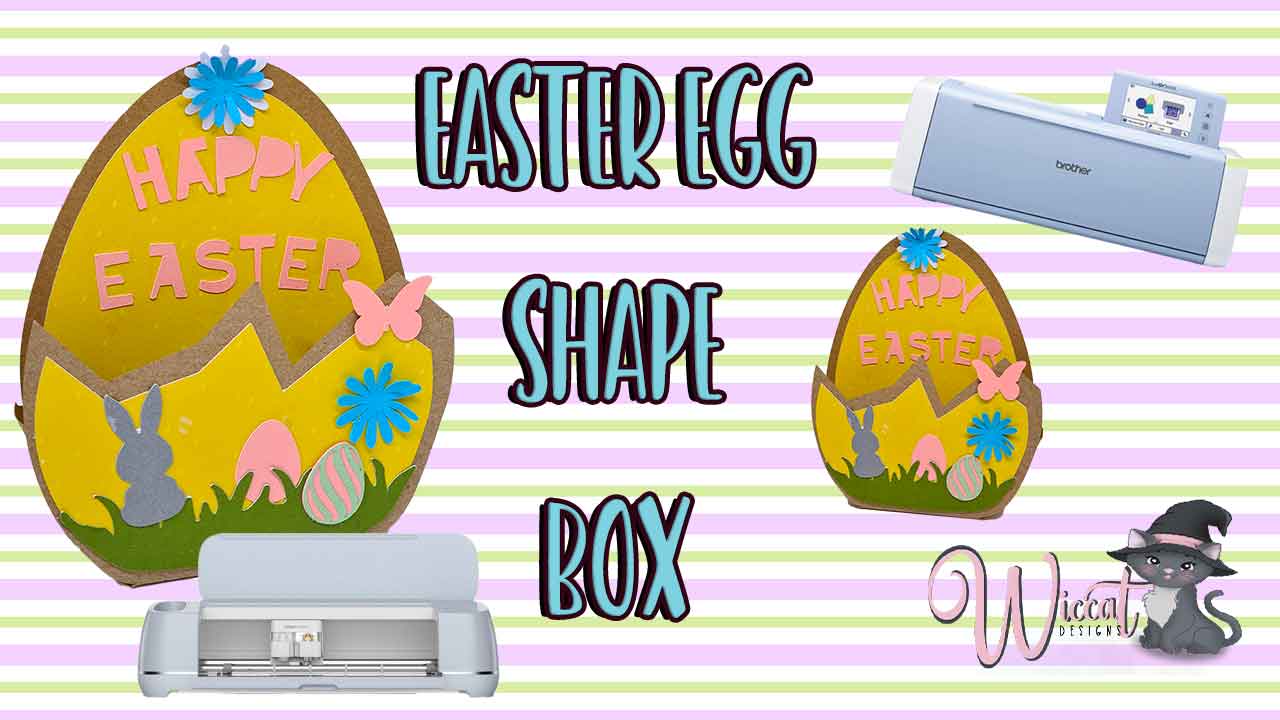
Spring is in the air, and Easter is hopping around the corner! This year, ditch the boring store-bought favor boxes and create these adorable Easter egg shaped ones with your cutting machine (ScanNCut, Cricut, or Silhouette) and my digital cut file . They’re perfect for Easter egg hunts, parties, or simply adding a touch of springtime charm to your gift-giving.
Materials:
Cardstock (pastel colors or patterned for spring vibes)
Cutting machine (ScanNCut, Cricut, or Silhouette) with compatible mat
Optional: embellishments like ribbons, twine, stickers, or artificial flowers
Instructions:
Download and Upload: Download my Easter Egg Favor Box digital cut file and upload it to your cutting machine’s design software. Follow the software’s instructions for uploading and selecting the design.
Adjust and Cut: Adjust the size of the design in your software to fit your desired box size. Ensure your material selection in the software matches your chosen cardstock type. Place your cardstock onto your cutting mat according to your machine’s instructions and load it into the machine.
Cut Time!: Click “cut” and let your machine work its magic! Once the cutting is complete, carefully remove the excess material from your mat.
Assembly:
Fold and Glue: Following the design’s layout, carefully fold the cardstock along the scored lines. Apply glue to the designated tabs or flaps and adhere them to secure the box’s shape.
Personalize and Decorate (Optional): Get creative! You can personalize your favor boxes by adding names, initials, or small Easter messages using a fine-tip marker or vinyl lettering. Decorate them further with ribbons, twine, stickers, or even small artificial flowers for a delightful spring touch.
Tips:
Use different colored cardstock to create a variety of Easter egg-cellent boxes!
For a more durable box, consider using thicker cardstock or add a layer of double-sided tape to the seams before gluing.
Get the whole family involved in the crafting fun! This is a simple and enjoyable project for all ages.
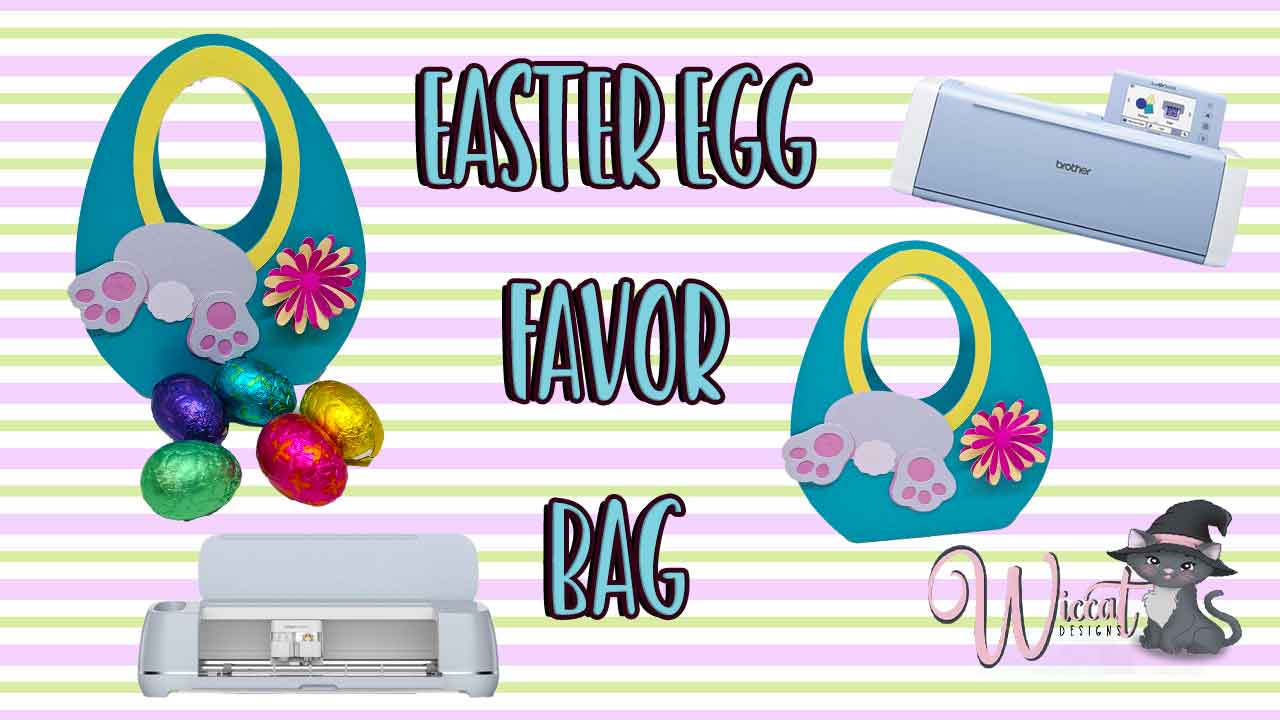
Get ready to add a touch of whimsical fun to your Easter celebrations with these charming paper Easter egg favor bags featuring a peeking bunny bum! This project is perfect for using your Cricut, ScanNCut, or Silhouette cutting machine and boasts a unique twist – the design only shows the backside of a fluffy bunny tail and little legs. It’s sure to spark curiosity and laughter as guests discover the hidden gem!
Supplies:
My Easter Favor Bag Bunny Bum digital design (from my store!)
Cardstock in various colors (white, pink, brown, black, etc.)
Choose your color scheme: Select cardstock colors for the bag, bunny elements, and any embellishments you desire.
Cut the pieces: Load your chosen cardstock materials and follow the prompts to cut out all the design elements.
Prepare the bag: Fold the main bag piece along the score lines. Decorate the bag with additional embellishments like polka dots or stripes before assembling (optional).
Now comes the fun part – adding the sneaky bunny bum!
Tip: Before folding the bag completely, it’s easier to attach the bunny details. This ensures they don’t get hidden or crushed.
Adhere the fluffy bunny tail: Apply a thin layer of adhesive to the designated area on the bag’s back. Carefully position the fluffy tail piece and press firmly to secure.
Add the paw prints: Using your chosen adhesive, attach the paw print cutouts below the tail, creating the illusion of peeking bunny legs.
Personalize: You can add little touches like a name tag or a tiny flower peeking out from under the tail for an extra personal touch.
Finalize the bag:
Fold the bag along the remaining score lines and assemble it. Secure the bottom using glue or double-sided tape.
Fill with treats and goodies: Candy, small toys, or Easter-themed trinkets will make these favor bags irresistible!
Pro-tips:
Use glitter cardstock for the tail for an extra touch of sparkle.
Create different color variations for a vibrant Easter party atmosphere.
Share the joy!
These adorable Easter favor bags are sure to be a hit with kids and adults alike. Display them on a table at your Easter gathering or use them as party favors – no matter how you use them, they’ll bring smiles and laughter to your celebration.
Don’t forget to visit my store to download the Easter Favor Bag Bunny Bum design and create these delightful goodies! Happy crafting and Happy Easter!
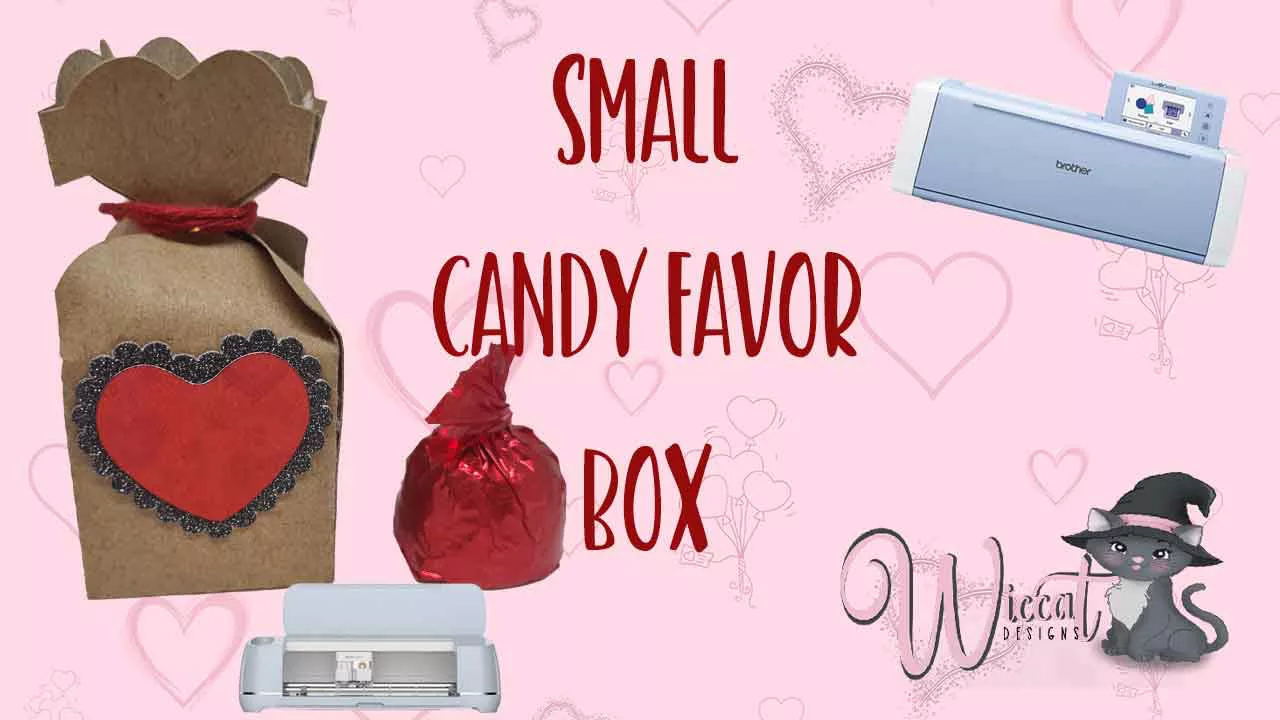
Creating your own personalized candy boxes is a fun and rewarding way to add a touch of elegance and thoughtfulness to your gift-giving. Whether you’re crafting a small box for a friend’s birthday or a party favor for a special occasion, these simple yet elegant boxes are sure to delight and impress.
Gather Your Supplies
Before you begin, ensure you have the following materials:
Prepare the Design File: Upload or create the desired design file for your candy box. Make sure the file is compatible with your cutter’s software.
Resize the Design: If necessary, resize the design to fit the desired dimensions for your candy box.
Import the Design to Your Cutter: Open the design file in your cutter’s design software and follow the instructions to import the file.
Set Cutting Settings: Adjust the cutting settings based on the material you’ll be using. For cardstock, a medium pressure and deep cut setting are typically sufficient.
Cut the Material: Load the selected material into your cutter’s cutting mat and carefully guide the machine through the cutting process.
Fold and Glue the Box: Carefully fold the box pieces along the score lines and adhere them together using glue.
Embellish as desired (optional): Add embellishments like ribbons, stickers, or decorative paper to personalize your candy box.
Fill the Box with Candy or Other Treats: Fill your completed candy box with your favorite candies or treats and add a personalized message on the inside.
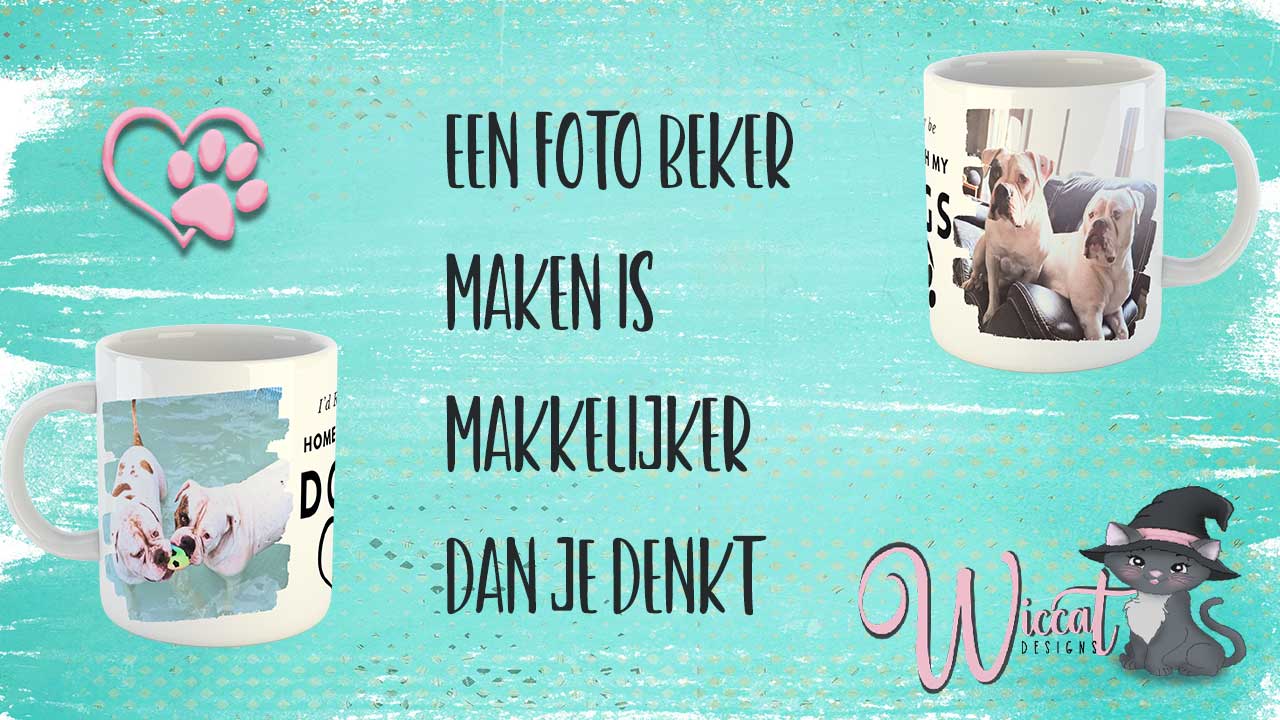
Want to make a personal and unique photo mug? Then sublimation is a good option. Sublimation is a technique where a photo is transferred to an object using heat and pressure. In this blog post, we’ll show you how to make a photo mug with Canva.
Materials:
A white sublimation mug
Sublimation paper
Sublimation printer
A sublimation press
Steps:
Choose a photo. The photo should be in high resolution so that the details are clear. You can use your own photo, or you can download a photo from the internet.
Design your mug. Open Canva and create a new design. Choose a background color and add your photo. You can also crop or rotate the photo. Down below is the link to my youtube tutorial to help you step by step
Print your design. Print your design out on sublimation paper. Make sure the photo is printed in the correct direction. If you use text in your design don’t forget to mirror
Sublimate your design. Place the sublimation paper, print side down, onto the mug. Then place the mug in the sublimation press. Set the press to the correct temperature and pressure. 360 degrees and 180 seconds
Let the mug cool. Remove the mug from the press and let it cool. I use a bucket of water to cool the mug.
Tips:
Make sure the mug is clean and dry before sublimating the design.
Follow the instructions of the sublimation press.
Result:
After following these steps, you will have made a unique photo mug. You can use the mug to drink coffee, tea, or other beverages. The photo will last for years.
Sublimation is a fun and easy way to make your own unique photo mug. With Canva, you can easily create a design and with a sublimation press, you can transfer that design onto a mug.
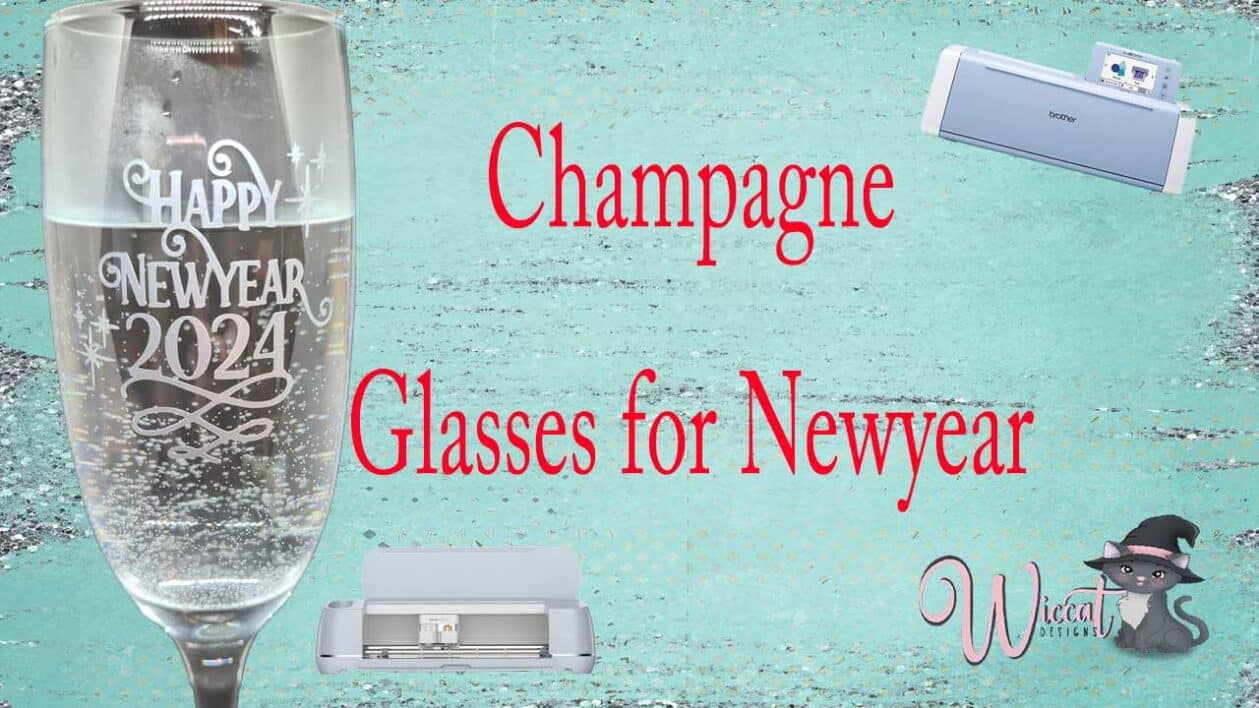
Celebrate the New Year in style with dazzling champagne glasses adorned with custom vinyl designs. Using a Cricut, ScanNCut, or Silhouette cutting machine, you can easily personalize your glasses with festive messages, sparkling patterns, or even iconic New Year’s images
What You’ll Need:
A Cricut, ScanNCut, or Silhouette cutting machine
Vinyl sheets in your desired colors
Champagne glass
Step-by-Step Guide:
Open the design software. Launch the software associated with your cutting machine and create a new project.
Design your vinyl artwork. Choose from various design elements, such as simple text messages, intricate patterns, or eye-catching images. Use the software’s tools to personalize your designs and fit them to the size of your champagne glasses.
Send the design to your cutting machine. Connect your cutting machine to your computer and load the desired vinyl sheet. Once the design is ready, select the “Send” button to transfer the design to the cutting machine.
Cut the vinyl design. Follow the on-screen instructions to securely place the vinyl sheet on the cutting mat. Your cutting machine will carefully cut out the design, leaving behind a precise vinyl stencil.
Fill your glass with warm water for better adhesive and a straight line to put your design straight
Transfer the vinyl design to the champagne glass. Carefully peel off the backing paper from the vinyl stencil, leaving the design adhered to the transfer tape. Position the vinyl design centered on the champagne glass and use the squeegee to smooth out any air bubbles or wrinkles.
Design Inspiration:
Elevate your New Year’s Eve celebration with these creative vinyl design ideas:
Festive Text: Bring a touch of elegance with a simple “Happy New Year” or a bold “2024” message.
Sparkling Patterns: Enhance your glasses with shimmering snowflakes, twinkling stars, or a cascade of confetti.
Iconic Images: Capture the essence of New Year’s with a champagne bottle bursting with bubbles or a dazzling fireworks display.
With a little creativity and these detailed instructions, you’ll transform your champagne glasses into personalized masterpieces. Cheers to a New Year filled with joy and style!
Share this:
Like this:
LikeLoading...
Cookies
We use cookies on our website to give you the most relevant experience by remembering your preferences and repeat visits. By clicking “Accept”, you consent to the use of ALL the cookies.
This website uses cookies to improve your experience while you navigate through the website. Out of these, the cookies that are categorized as necessary are stored on your browser as they are essential for the working of basic functionalities of the website. We also use third-party cookies that help us analyze and understand how you use this website. These cookies will be stored in your browser only with your consent. You also have the option to opt-out of these cookies. But opting out of some of these cookies may affect your browsing experience.
Necessary cookies are absolutely essential for the website to function properly. This category only includes cookies that ensures basic functionalities and security features of the website. These cookies do not store any personal information.
Any cookies that may not be particularly necessary for the website to function and is used specifically to collect user personal data via analytics, ads, other embedded contents are termed as non-necessary cookies. It is mandatory to procure user consent prior to running these cookies on your website.